When we moved into our home here in Oklahoma (a little over a year ago), we had to make a few changes with how we stored things. We went from having a large basement in Colorado, to none. So, a lot of the stuff we were used to storing in the basement (i.e. kids toys, books, games, etc), we had to find new places for. We have a bonus room in this house that is also a “media room”, but we decided right away to turn it into more of a “playroom” for the kids. However, the room was already wired for speakers and all that electrical stuff and Steve was so excited at even the slightest possibility of finally having a room that was dedicated to big screens and loud volume numbers and lots of electrical wiring and nerdy stuff like that! ;) So we decided that we could make this room work for both needs……as long as we got creative with some storage.
Well, we already had some tall storage units with doors that we hauled from Colorado and initially set those up in this “media room” for toy storage. But nothing looked cohesive and the storage units just looked wonky in there, and like they obviously didn’t belong. So, we figured that these shelves have lasted this long, were still really strong and sturdy, and seemed to be holding up as good as anything else, so we used them as a base and created a whole Custom Built-In look with them.
And ahhhhhh…….so much better!

Now, there’s a place for all of those toys and games that the kiddos can get out and put away….but we can also use the room to gather and enjoy a loud movie, because you know — speaker wiring!! ;)

So instead of buying a bunch of lumber and spending additional time creating an actual shelving structure and adding door and hinges, etc……we turned those very simple (and inexpensive) bookshelves and storage units from Ikea, into really functional Built-Ins!!!! And let me tell you, this thing is one sturdy piece of not-going-anywhere furniture!

Adding Built-Ins offers so much storage space, without really taking up that much room.
Space up against a wall ends up getting wasted anyway, so it’s nice to see it put to good use!

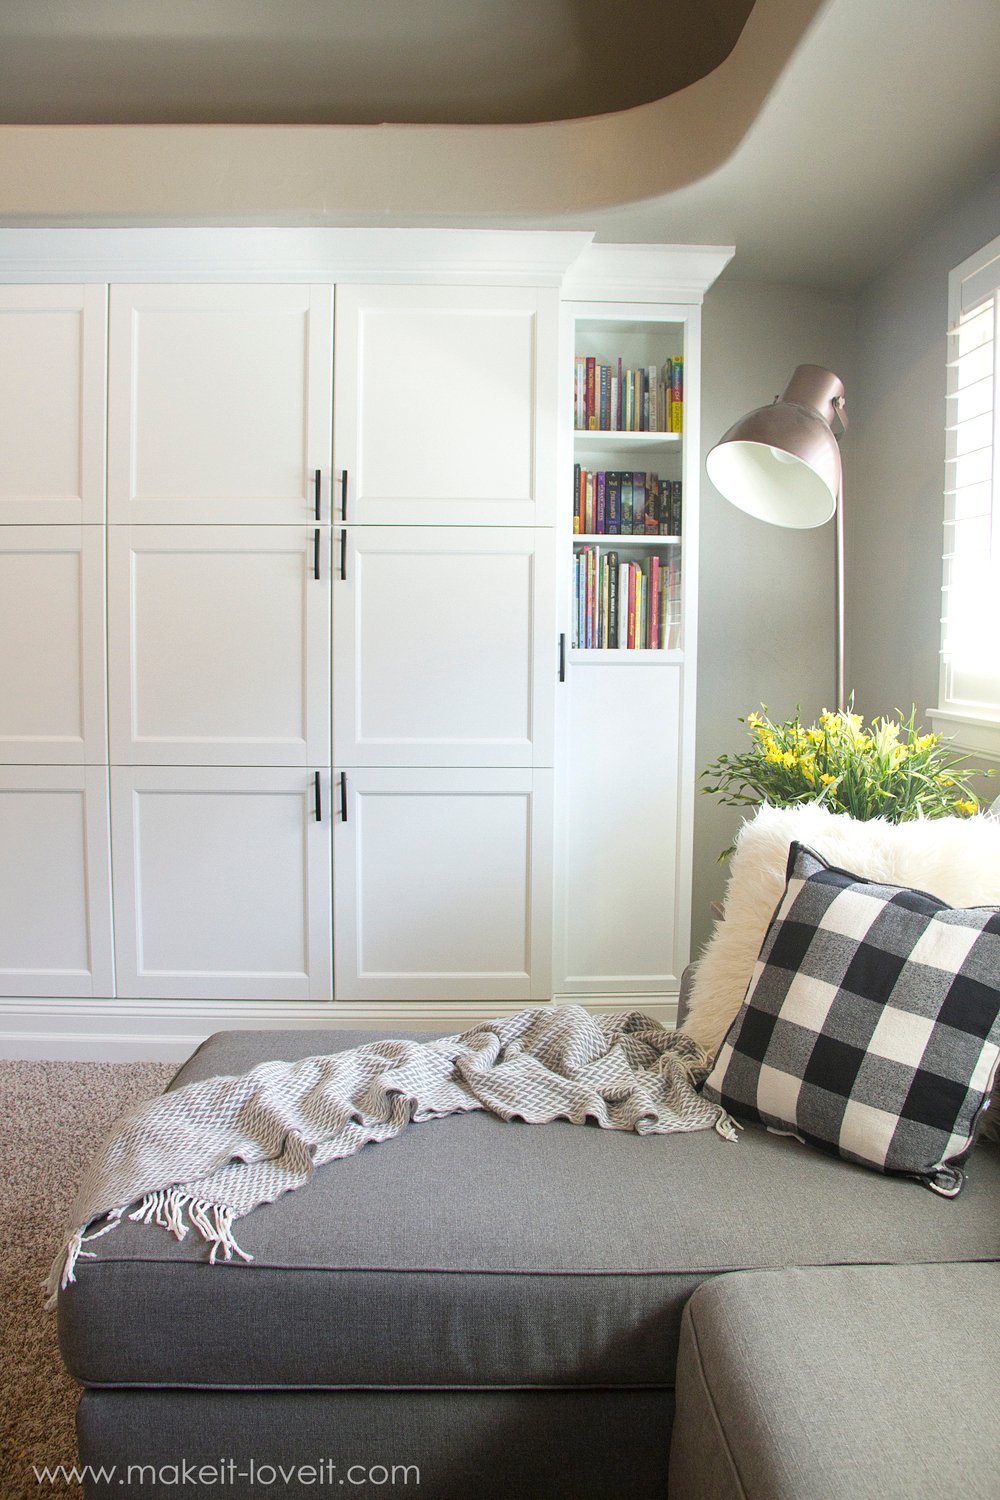
Our kids can reach the lower cabinets, which are filled with bins of all types. The 2 side shelves are filled from top to bottom with books. When friends come over, they can dig right in too. The very top row of cupboards are filled with things that they have to ask permission to use….and it has worked well for us!

The units are slightly up off the ground on a 2×4 structure, so that we could add some baseboards around the bottom, that match the baseboards in the actual room. Making it look fluid and like a permanent part of the room.

The crown molding along the top really makes this whole thing pop….and looks a little more “grand”!

Adding your own hardware makes a huge difference too. And these pulls are nice and large, making it easy for everyone to use!

Cute little Chloe was watching while I was taking pictures in here and asked if she could “pretend” to read in one of my pictures. Haha! I told her of course….so she hopped up on the couch and plastered that little “modeling grin” right on her face! Ha….she cracks me up!
But really, a whole lot of playing, reading, and family time happens right here in this room…..and having the storage makes it a pleasant and orderly place to hang out!

Oh, and in case you were wondering if we saw eye to eye on the whole “projector” dream of my husband’s……yep, it came true. And he’s in 109-inch projector screen heaven!
But just as a little side note, we ended up creating another little Built-In, right under the projector screen. (Yep, it’s true….once you start, you just can’t stop!!!) This little Built-In houses some of our players and a game console and then the drawers hold movies and some workout weights and such. It’s not completely organized…but I took a picture anyway!

We used 3 more little Ikea units to create the center of the Built-In, which already came with drawers and doors and hinges etc…..making the whole process of a Built-In SO MUCH FASTER!!! (And cheaper too!)
We used baseboards around the bottom too, to tie it in with the rest of the room and constructed very simple little side shelves from some inexpensive wood, so that we could slide some baskets in there. (Those baskets are actually from another room, because I still haven’t bought ones to fit these openings yet. But I will.)

Oh, and we decided to change things up a bit and create a chunky wood top, made from piecing together slats of poplar, that we then stained to our liking….and then attached to the top of the unit. Oh my goodness, we are in LOVE!!! (And the process for piecing that together and staining it, was similar to our Octagon Dining Room Table Tutorial.) I didn’t take any pictures of the process for this one, because it’s similar to the bigger Built-Ins along the wall — but I just wanted to show you that you can use this same “Built-In concept” and get creative with all sorts of spaces and needs…..especially if you’d like to save a little time and cash! Both of which make Steve and I very happy!!

Now, let the truth be told, we were pretty sure this would all turn out, but we are about 100 times more thrilled with how beautifully it really turned out to be!
Okay, so let’s get started!
I know everyone’s homes, ceiling heights, and built-in needs are different….so it would be impossible to give you exact instructions to fit everyone’s needs, so I’m going to show you how we put ours together (along with links to what we purchased) to give you a baseline of how this worked for us. You’ll of course need to make adjustments for your own built-ins, but once you see how this all fit together, hopefully it will help with your own built-in project. Because yes, this way saved us a LOT of time and definitely saved us some cash too! Both great things! :)
SUPPLIES:
First of all, our cabinet heights were not exactly the same. The narrow Billy Bookshelves on both ends were actually taller but since they are recessed, the difference works. But, we decided to make the top all one height, to give the crown some uniformity. (However, it doesn’t have to. You’ve probably noticed kitchen cabinets with different heights….and it works. But we wanted ours to meet the ceiling at the same height.)
So we built a platform for the center units to sit on by using some 2×6’s nailed together on their sides into a large rectangle and then several smaller perpendicular support pieces that fit all the way along the inside of the rectangle, to offer more support. Then, we did the same thing for the 2 side bookcases, but with some 2×4’s that we cut down to size, so that once all of the bookshelves were sitting on top, they’d be at the same height. Before placing the cabinets on top, secure all of the bases together so that it’s one solid piece. Then, screw the base into the wall studs. (You also either need to remove the baseboard that’s up against the wall, or cut out sections of your base you just made to fit around the baseboard.) Next, we placed all of the units on top of the base and screwed them into the base, as well as anchored them into the wall.)

Here’s a closer look at the base the cabinets sat on. Also keep in mind while you’re putting things together that baseboard trim will be added later on to cover all of this up, but make sure you have accommodated for the baseboards when making the cuts for this base section.

Also, if you’re using multiple storage units, it’s a good idea to screw them together along the sides, to pull them in together tight. This is a technique that kitchen cabinet installers use too, to keep all cabinets nice and snug, and so that it looks like one continuous unit. And don’t worry, you can hide the screws and such later if you want.

Now, your crown molding needs something to attach to. So place a 2×4 on top of the units and use a clamp to keep it in place while you screw the 2×4 in place from inside the cabinet.


Make sure to add enough 2×4 around all the upper edges.

Now, because we were trying to hide more height than the height of the tallest crown molding we could find, we decided to create the stacked look (which is also a very common way to create taller crown molding). But instead of using 2 pieces of crown molding, we placed a piece of 1×6 MDF so that the cabinet height went straight up, creating the illusion that the cabinets were actually taller. But if you have to do this, be sure to set the 2×4’s back a bit, to compensate for this extra depth.

Now, you can add the crown right onto the MDF (or onto the 2×4 if you didn’t need the extra height).


Once the crown molding has been attached, fill in all the holes with wood filler and all of the cracks with some caulk. (Want some tips on using caulk??)

Once done, it should look like this!

And let’s just chat a minute about the construction of homes and how they’re never perfect. Corners are hardly ever 90 degrees and rarely is everything perfectly level. Grrrr……it will make you crazy. But you sometimes have to find solutions. For example, the ceiling portion of this overhang in our media room was terrible un-level. So, if you look closely, we had to cut a wedge of wood to slide above the crown molding in the upper left hand corner. Now that it’s all painted and such, it’s hardly noticeable, but uggggh, kind of annoying that it was so uneven. But just remember, you’ll probably run into a surprise or two that you have to fill in, cut shorter, fill with caulk, or somehow tweak. And that’s OKAY! :)

For the bottom, add your baseboards. And since we wanted a grander (or chunkier) base, we stacked 2 pieces of standard 3 1/2 inch baseboard.


***Also, you may notice a slight height difference on the right side, where the 2×4’s are showing. If the same ends up happening to you, fill with wood filler and then smooth out any inconsistencies with some caulk.
Now, make sure to fill any other holes with wood filler and any cracks with caulk, until the entire built-in looks like one unit.

Once that’s dry, paint over the upper and lower portions of the built in and any other spots where you have filled or added caulk. (To find the right color paint, take a door with you to Home Depot or Lowe’s and color-match with the same shine.)
Now, it’s time to sit back and enjoy your hard (but not too hard) work!!!!
Enjoy!
Ashley

Hi, I’m Ashley—the DIY-enthusiast behind this crazy blog!


