Hey everyone! So, remember back to the post where we were voting on costume ideas and all of you voted on your top 11 costume ideas that you really wanted to learn to make?? Well, during the vote, it was looking like a mermaid costume was was going to be a top contender. During the votes, I was contacted by Cassidy from the LITTLE IMAGINATIONS SHOP…….which is a darling handmade costume shop full of the most imaginative costumes, including the sweetest mermaid tails. Cassidy offered to create a tutorial here with all of you, and share exactly how she makes her mermaid tails! Ummmmm…….YES!!! I had already started gathering supplies at this point but figured, hey, why not have 2 varieties to share with you guys. Our versions are a little different, so this is perfect! :)
You guys, these tails are killing me! Cassidy has the perfect method and very clear instructions, that I bet any one of you could create….and they look so polished and perfect for imaginative play! I love that she volunteered to share her shop secrets! (However, if you’d rather not make one…..you can always order from her shop. And if you’re wanting it for Halloween, you better hurry and place your order before October 10th. Or, you could gift one for a birthday or Christmas gift!)
I’ll still be creating my own later this week, but hey, you may never need them after you scroll this tutorial. it’s perfect!!! And I love that Cassidy was so willing to share! Take it away Cassidy…
-Ashley
. . . . .
Hi guys! I won’t waste long introducing myself – because lets be real, you just want to get creating!
I’m kind of having a “fan girl” moment here – Ashley’s blog was one of the first I started following when I taught myself to sew 6 years ago. So much good stuff here, right?! She got me hooked with all her tutorials for baby and little kid stuff – and even now, being a few months away from adding baby #9 to the family, I still come back to whip up some of those ‘oldies’!
And don’t even get me started on all these Halloween costumes this year – it makes me itch to get to my machines and try them out for myself.
You see, I LOVE kids playing “pretend”, and nothing completes the fun more than a great costume. When my kids’ dress-up box was overflowing, but I still had more things I wanted to make, I decided I needed to start selling my creations and sharing the love…so I opened my Little Imaginations Etsy shop 4 years ago.
My focus when I design a costume is 2 things: appearance (That looks so fun!); and functionality (but can they move?!).
When my daughter was about 3, she was ALL ABOUT mermaids. And shiny, pretty things.
And she is about as graceful as I am – which is to say, not at all. Tripping over your own feet is a common occurrence in our house.
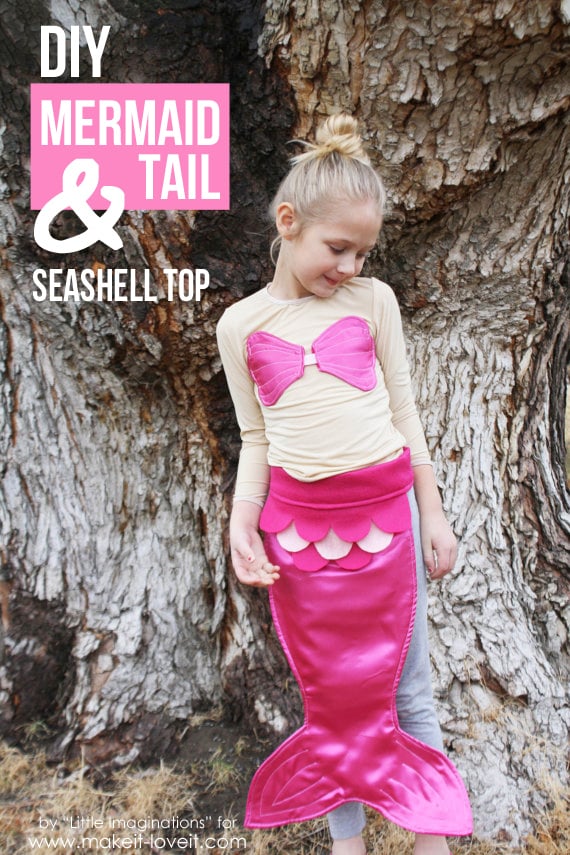
All the Mermaid Costume designs I could find involved some really beautiful yet really dangerous (for my 3 year old) full skirt-type tail. So my momma-brain started churning, and after some trial-and-error and serious “make it work!” moments, I designed this:
The easiest way to describe it is “apron-like”. The tail is just in the front, and is attached to a waistband that has velcro on the ends – so you can adjust it to fit a variety of sizes!
The seashell top took a little longer to develop, and is a little more size-specific – but a simple chest measurement is enough to get you going.
Side note: I’ve made hundreds of these tails in the last 4 years – so the steps to making them have become so automatic it was kind of difficult to put into words! Being a self-taught sewist, some of my methods might be a little…odd. There’s a good chance there’s a better way to do some of this. Just, you know, a heads up :)
Are you ready to give these a shot?! Since we’re sewing with some kinda-tricky fabrics, I would recommend at least basic sewing skills already. It should take you about an hour or so for the tail, maybe 30-40 minutes for the seashells. Read through all the instructions first; it’ll go much faster for you if you have an idea where you’re going!
MERMAID TAIL
First up, select your size and download the pattern. Confession: I am not the most computer literate person. The program I used to digitize the patterns (Illustrator) and I are NOT getting along very well yet. We’re like sisters – we love to hate each other, but in the end we’ll be best friends. I’m sure of it. I’ve printed and tested all these patterns myself, but if you run into any issues please let me know!
For sizing, I usually recommend a Small for 2t and under; Medium for 3T to about 6; Large for any size above 6.
Print out the pattern, tape them together, and cut it out.
Let’s start by cutting out the strip of felt for your waistband. I usually use the following measurements for each size of tail:
If you find your child is either a little slimmer or a little fluffier than “average”, you can add or subtract some to the larger number. The ends of the waistband will be overlapping about 4 inches, so if your size 5 child is a little stout (like some of mine!) you might cut a band that is 6″ x 28″ instead.
Lay your costume satin shiny side DOWN. Trace the tail pattern (this will be on the wrong side of the satin), and cut it out.
Lay the tail piece (shiny side DOWN) on top of your main felt. Smooth it as flat as you can and pin carefully around the edges. Costume satin can snag easily, so pinning just along the edges (right about where we’re going to sew) should prevent any nasty runs in the middle of the tail. Just make sure to pin a LOT – this stuff can get slippery!
Cut out the felt *about* 1 inch larger than the satin – like in the picture, just cut out the rough shape. We’ll be trimming it down later.
On the pattern, there are two little dots right about where the fin starts. I call these the “pivot points”. Go ahead and transfer them to the satin now – you’ll be using them in just a second!
Starting at the top right corner, sew around the satin tail, lining up the edge of the sewing machine foot with the edge of the satin. (Yeah, that’s how I do ‘seam allowances’…lazy, I know! For me this is about 3/8″.)
When you get to that dot, stop with your needle down and pivot so that you can continue following the edge of the satin. For experienced sewists, that’s probably a “duh!” instruction – but if you’re just starting out, it might not make sense. You want a good, strong change of direction in your seam – this will make it look much nicer once we turn it right side out.
Continue around the tail, pivoting again at the other pivot point. Finish at the top left corner of the tail – leave the top straight edge open.
Trim the felt down to match the edge of the satin.
Now, we’re going to deal with some of those tricky corners – just try not to get closer than about 1/8″ to the seam when cutting in these next few steps.
Cut a notch in each corner right by the pivot point.
Clip the corners of each tail point. Clip the curve at the bottom of the fin (you can notch it if you want, but I find just clipping like this works fine).
Turn the tail right side out, using your fingers or a chopstick/pencil/pointy object of your choosing to push out the point of the fin and along all the curves.
Flatten it down with your hands – DO NOT IRON. I know, this goes against everything you’ve ever learned with sewing! But costume satin doesn’t always like to get wet, so the steam can do some funky things to it. And felt – well, felt is just ornery. Ironing means nothing when it comes to felt.
Pin along the edge of the tail – use A LOT of pins. I’ve mentioned it before, but I’ll say it again – costume satin can be tricky! It likes to slip and slide when you least expect it. Nothing a few pins can’t bully it into behaving for, though. (Seriously, use more pins than I did in this picture. You’ll thank me later.)
Topstitch around the edge of the tail, about 1/4″ from the edge. Remove the pins as you sew. If you think you need it, feel free to mark those pivot points again (just keep it small and use a light colored pencil, you don’t want that dot visible after you’re done sewing.)
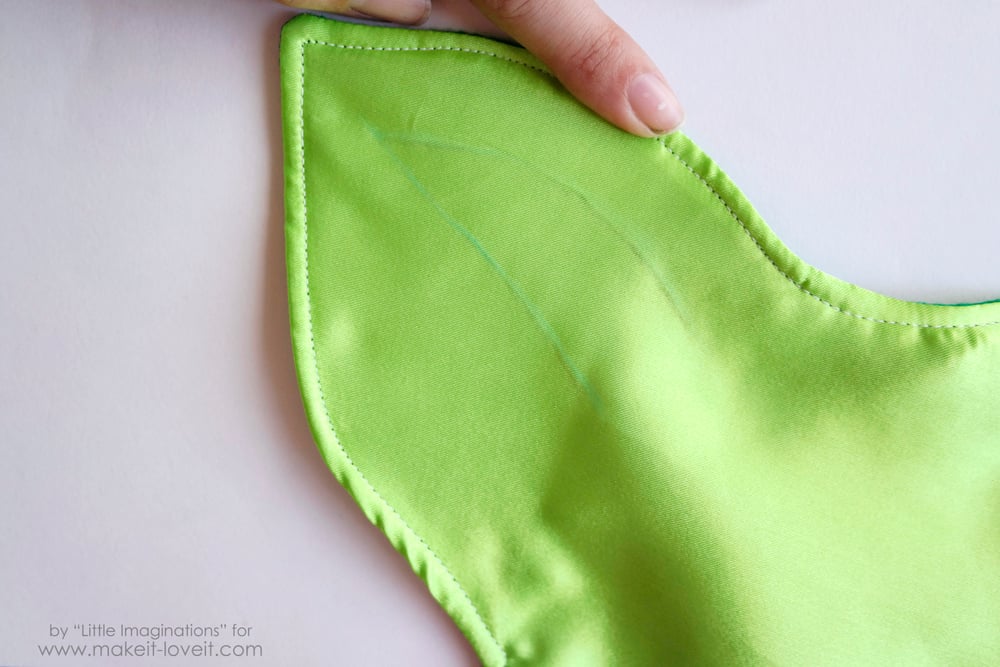
Now we’re going to add those accents on the fin. First, change your stitch length to about 1 or 1 1/2 (my usual length is 3).
Grab a light colored pencil (you just want it visible enough for you while you’re sewing, not afterwards. Try testing on scraps of satin to see how it will look.) Starting at 1″ from the point of the fin, draw a straight center line about 4″ long (or as long as looks good to you).
Back at the start of that line, draw another line that mimics the curve of the fin but stays about 1″ from the edge. Do the same for the other side of the straight line.
Stitch each line, backstitching really well at the beginning and end of each one. Repeat the same process for the other fin. (Change your stitch length back to normal.)
Let’s work on those scallops now. Cut out (2) of the 4-scallop pattern from your main felt color. Take one of those pieces, and cut it in half – now you have a 4-scallop piece and a 2-scallop piece (and an extra 2-scallop piece that you don’t need).
Use your 3-scallop pattern to cut out a piece from your accent felt.
Lay the 4-scallop piece along the top of the tail. Pin in place.
Tuck the 3-scallop piece underneath the 4-scallop piece about 1 1/2″. Pin in place.
Do the same with the 2-scallop piece. Step back a bit and check to make sure it looks ok; adjust if needed.
Stitch across the straight edge of the 4-scallop piece.
Flip up the 4-scallop piece, and stitch across the top of the 3-scallop piece. Do the same for the 2-scallop piece.
Set aside your tail and let’s prep the waistband.
First, fold it in half so that it is 3″ tall x (whatever length you cut). Pin one piece of your velcro on the right end of the waistband, 1/2″ from the short end and 1/4″ from the fold. Make sure you are ONLY pinning it to the top layer of felt.
Flip the whole waistband over and repeat with the other piece of velcro. The velcro should be opposites of each other now.
Lay the strip flat and sew each of the velcro pieces in place.
Fold in half again, the same as before except make sure that the velcro is on the INSIDE. (The rough side of the velcro will catch the felt, but it should be fine. Felt is pretty hardy stuff.)
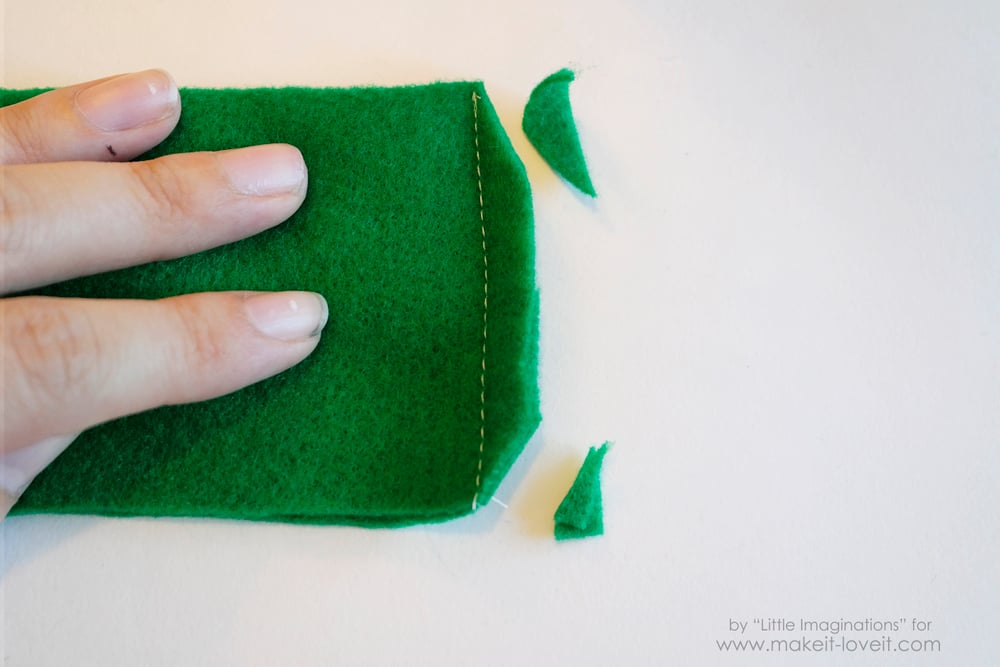
Sew each of the short ends, from the fold down to the edges.
Turn right side out. Clip the corners of each short edge (like in the picture above).
Next, find the middle of both the Tail and the Waistband and mark it with a pin. (I like to find the middle by folding the piece in half, but feel free to use a measuring tape to be more exact if you’d like.)
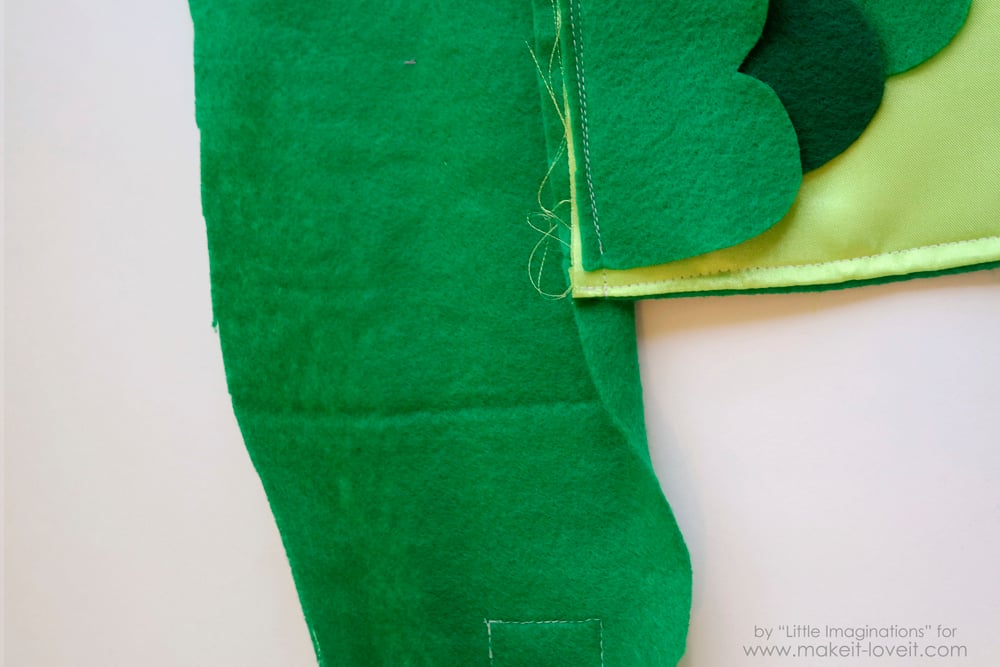
Lay the tail on top of the waistband, matching the middles. Pin the tail ONLY to the top layer of the waistband.
Sew along the top of the tail, trying to follow the stitching from when you sewed on the 4-scallop piece. Only sew it to the top layer of the waistband! I like to unfold the band and lay it as flat as I can underneath the tail, like you can kind of see in the picture.
Fold up the bottom edge of the waistband (where you just sewed the tail to) up 1/2″. Grab the opposite edge of the waistband and fold it down, tucking it under 1/2″. This creates a little sandwich with the tail in between. This is tricky for me to explain, so check out the pictures if you’re confused and hopefully that will help!
Pin it well along where the tail is attached, then continue with the rest of the waistband and pin with 1/2″ tucked in on each side.
Okay people, this is the last stitch! Sew along the long edge of the waistband, the part that you just pinned in place. You’ll be sewing 4 layers of felt, plus an additional layer of felt and layer of satin for the tail part – so go slow! Keep things pinned until right before you get to it – you don’t want it shifting now.
And your tail is done!
SEASHELL TOP
Print out the Pattern – it has all 3 sizes on one sheet of paper, so just select the seashell size you want and cut it out.
Here’s where you need the child’s chest measurement – because you want to make sure the elastic is tight enough around the chest that it actually stays up! Here are the final measurements for each size of seashell top:
Small – 20″, Medium 22″, Large 24″
When choosing the size, you want to go DOWN. So if your child measures 23 inches around the chest, you would make the Medium. If she’s measuring right at the size, I would recommend you still choose that size to sew, but when you add the elastic band you make it at least 1/2″ smaller. (Don’t worry, when we get there, I’ll point it out!)
On WRONG side of satin, trace the seashell twice. Leave 1/2″ – 1″ space in between the seashells. Cut the satin down to make a rectangle about 1″ around both seashells (it’s easier to work with this way).
Pin to felt, keeping the shiny side down.
Sew right on top of the marking, except the bottom straight line; leave that open.
Trim to about 1/4″ from the stitching around the curves, leaving 1/2″ to 1″ extra from the straight line (opening).
Carefully cut a notch in the “point” of each scallop. Try not to get closer than about 1/8″ to the stitching.
Turn seashells right side out. Use a finger/chopstick/pencil/pointy object of your choosing to gently push out the curves of the scallops. Tuck in rough edges of the opening.
Cut 3″ of the FOE (fold over elastic). Tuck one end of the elastic into the (folded) open end of a seashell. Pin. Repeat with the other seashell and the other end of the elastic piece.
Lay seashells on the table and measure – they should be 2″ less than 1/2 the circumference you want. (Hold on – its not as confusing as it sounds! For the Medium here—> 22 inch circumference divided by 2 = 11; 2 inches less than that is 9″. Or, here’s the basic sizes laid out: Small – 8″; Medium – 9″, Large – 10″). Adjust the elastic piece if you need to so you get that measurement.
Starting with the straight edge, topstitch around each seashell. I usually sew about 1/4″ from the edge.
Now we need to draw the details on. Use a pencil that will show up just enough for you to see while you’re sewing, but won’t be visible after you’re done. Since costume satin is not a fan of getting wet, you won’t be able to wash it away.
I’ll try to explain the best way to draw these lines, but it might just be easier for you to look at the pictures and imitate it.
First draw the outside lines – they go from the bottom corners to the middle of the outside scallops, mimicking the curve of the outside edge.
Next, draw the center line. It goes from the very middle of the bottom straight edge to the very middle of the middle scallop.
For the last two lines, you’ll go from halfway between the already-drawn lines on the bottom (straight) edge, up to the point of each scallop. It mostly mimics the outside lines in curving, but has just a wee bit more curving towards the scallop.
Stitch along all those lines you just drew. Go slow, and backstitch at the beginning and end of each stitch so it doesn’t come undone later.
Cut from the remaining elastic a strip to make your chest band. For the generic measurements, cut the following: Small – 12 1/2″; Medium – 13 1/2″; Large – 14 1/2″. (If you’re going to size it a little smaller, this is where you would cut it 1/2″ less!)
Take your elastic and lay it face up (shiny side up). Fold the end over about 1/4″.
Set seashell right over the elastic, just covering that 1/4″ you just folded over. The middle of the elastic should line up with the middle topstitching line. Pin in place.
Sew along the topstitching of the curve, just about where the elastic is underneath. It should blend in well enough that you don’t really see it, especially from a distance. Check the back of the seashell, making sure that the stitching caught the elastic like it was supposed to.
Wrap the elastic around to meet up with the other seashell, creating the chest band. Fold the end of the elastic over 1/4″ and lay the seashell on top and pin (like you did on the other side). Lay the top flat to measure. It should measure 1/2 of the finished measurement (Small – 10″, Medium – 11″, Large – 12″). Stitch along the topstitching of the curve like you did on the other side.
And that’s it! Go try it on your little mermaid!
-Cassidy
***Remember, if you’d rather not make your own Mermaid Tail…you can can find a variety of colors over in Cassidy’s shop, Little Imaginations. (Plus several other darling costumes your little ones will love!)
. . . . .
Looking for more??
You can find all sorts of DIY Halloween Costume Ideas HERE.

Hi, I’m Ashley—the DIY-enthusiast behind this crazy blog!