So excited to have Crystal from Stitched By Crystal back again today…..sharing some absolutely darling monogrammed pouches! Another great reason to never throw your fabric scraps away! :)
. . . . .
Hello again, Make it & Love it readers! It is Crystal, from Stitched by Crystal, here with another fun tutorial!
I love sewing zipper pouches! They are fun, quick to make, and great for containing all sorts of small things around the house. Plus they make really fun gifts! I personalized these little pouches with some initials, but don’t worry, no fancy embroidery equipment is needed for this project — just your regular ol’ sewing machine!
These are also great for containing small things like sewing supplies, art supplies, or (my favorite) sweets!
Planning a wedding? These would also make a really fun bridesmaid gift! Fill them up with some wedding day essentials; like breath mints, band aids, bobby pins, aspirin, lip gloss…stuff they might find useful on their big day!
And these little pouches are fully lined, so they look as pretty on the inside as they do on the outside!
Want to make a monogrammed zipper pouch?
Great! You will need…
***Check out the Sewing 101 post, for more help.
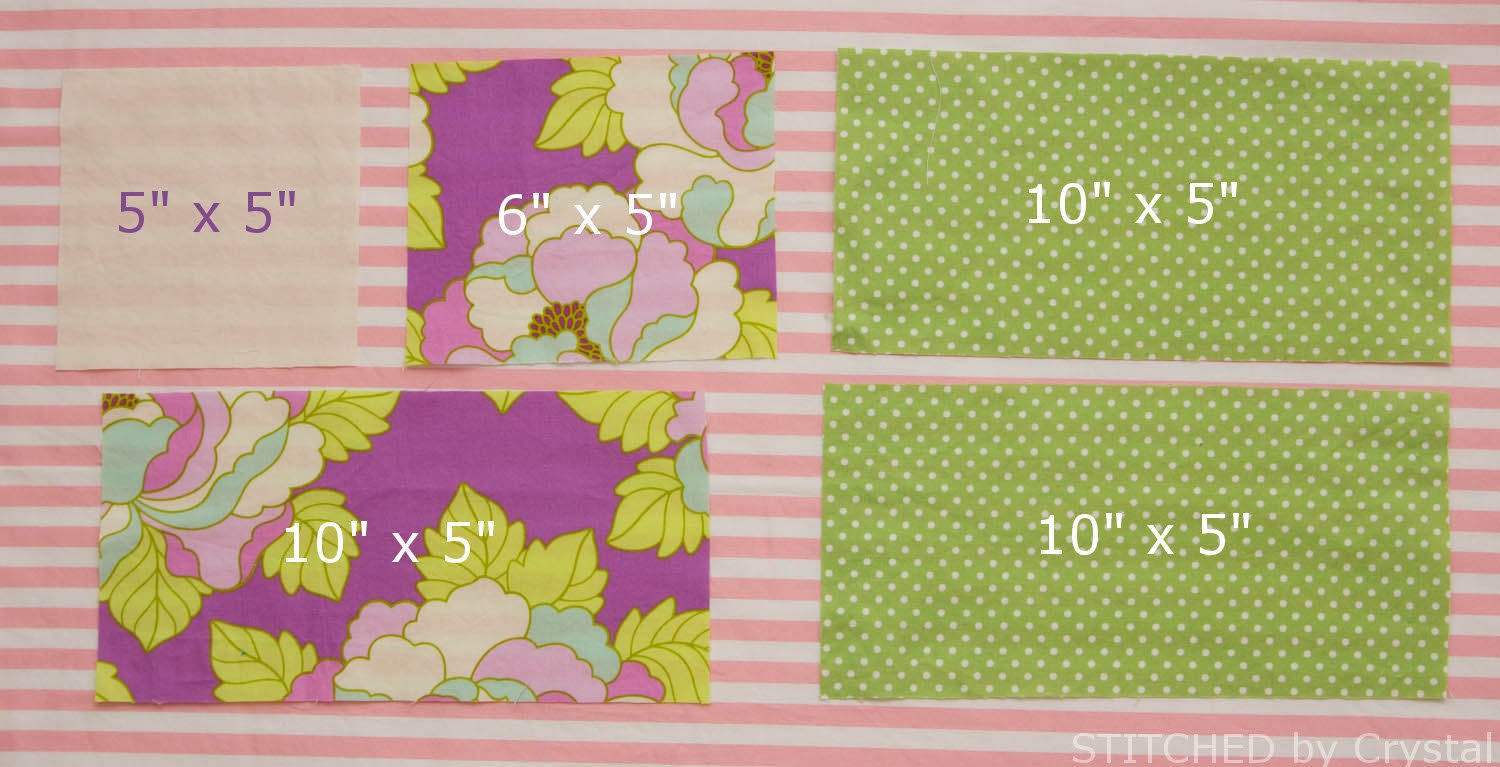
Start by cutting your fabric. You will need to lining pieces that are 10″ wide and 5″ tall and one 10″ x 5″ piece of your main fabric for the back of the pouch. For the front you will need 2 pieces, I cut my solid 5″ x 5″ and my main fabric 6″ x 5″. If you have a very wide or very skinny letter you may need to adjust the size of these pieces, but they need to be 5″ tall and the two widths must add up to 11″ (so, for example, you could do 5.5″ x 5″ and 5.5″ x 5″ or 4″ x 5″ and 7″ x 5″). You will also need a small scrap of your main fabric for your letter.
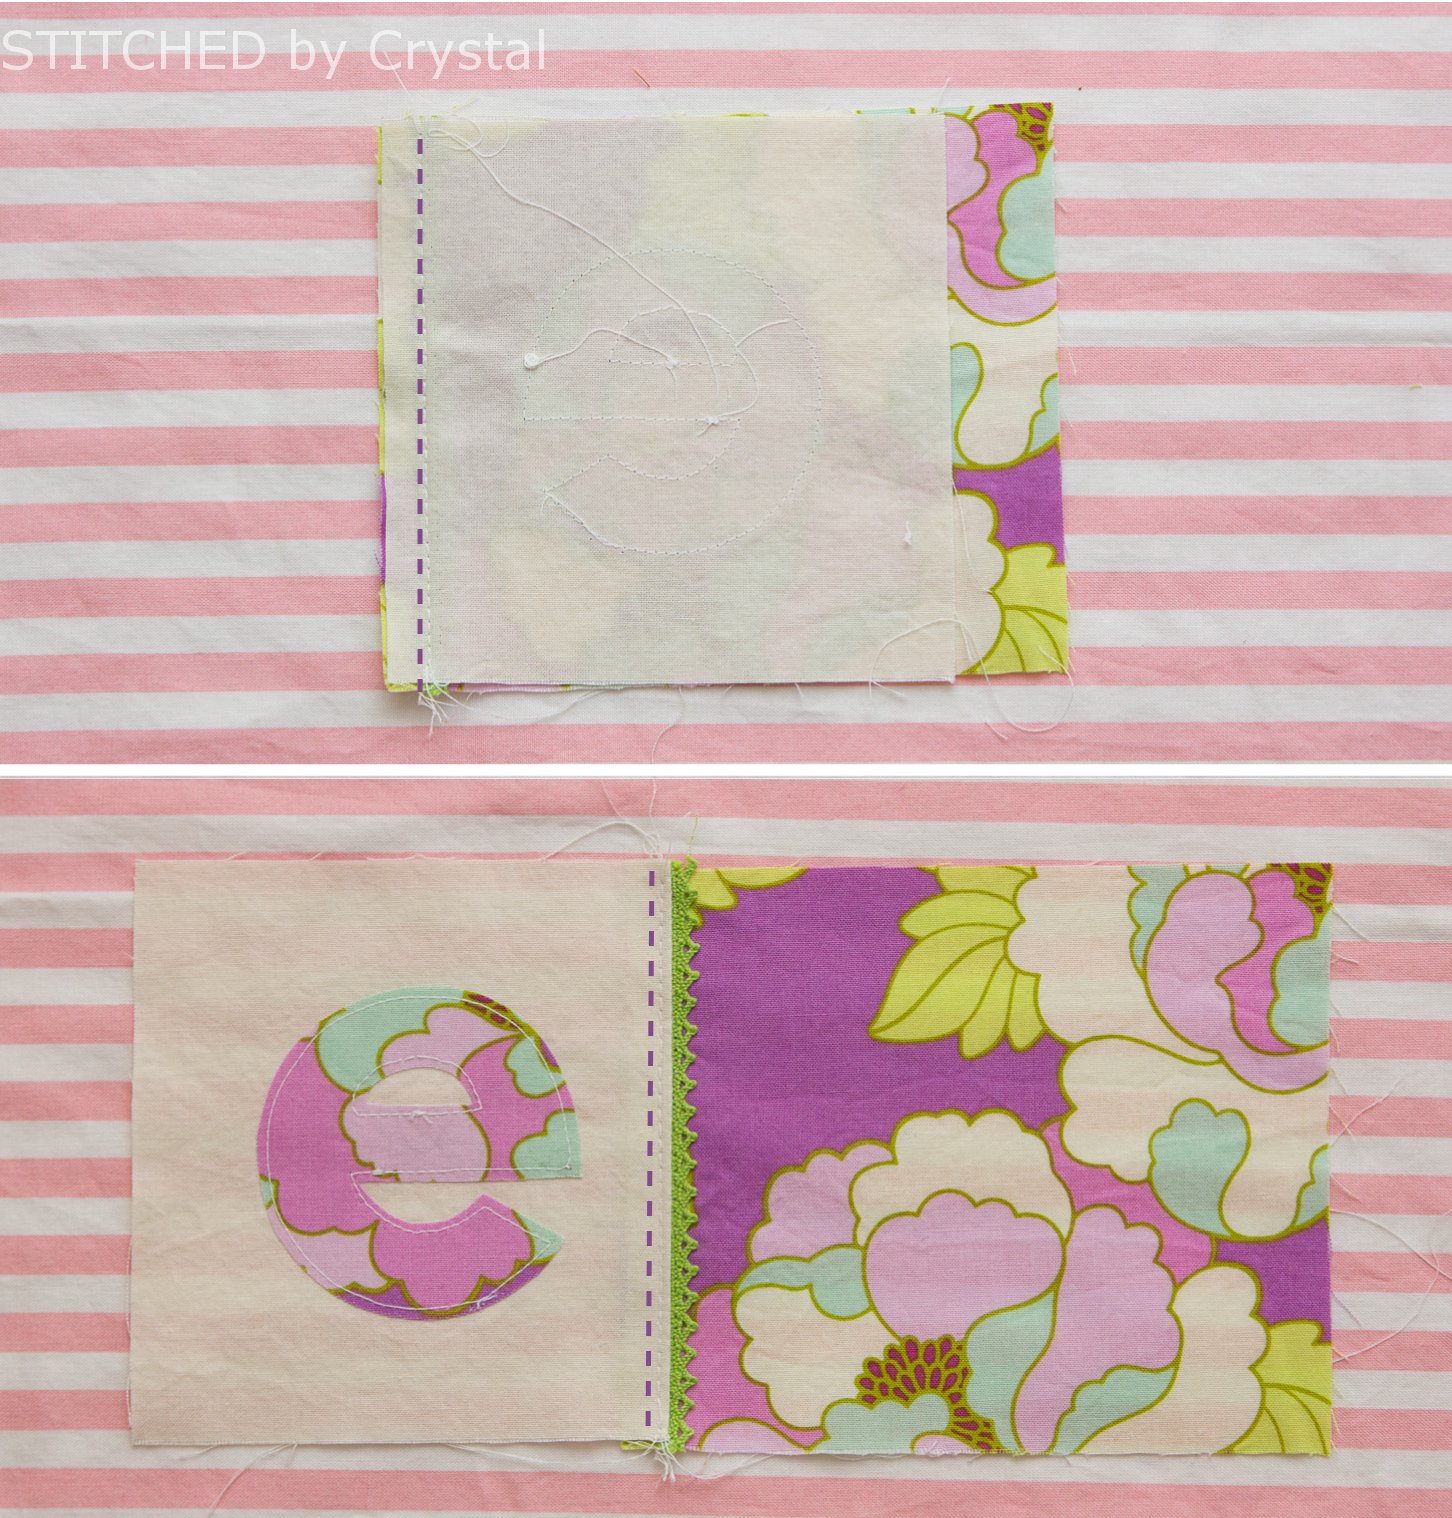
Draw your letter backwards on the paper side of your heat n bond. For a nice looking letter, you can print the letter in a large font and trace it. Then press the heat n bond to the back of the scrap of main fabric. Cut out around the letter. Peel off the paper backing and iron your letter to the middle of your solid fabric. Sew around the letter using either a satin stitch or a straight stitch. A straight stitch may fray a little over time, I like that look, but if you don’t like the frayed edge, use a satin stitch.
If you are using a trim, baste it to the edge of your main fabric piece. You will be sewing with a 1/2″ seam allowance, so make sure you account for that when placing your trim.
Place your front pieces right sides together and sew along the edge with a 1/2″ seam allowance. Press the seam towards your letter and topstitch.
Cut 2 pieces of fusible fleece that are 4″ x 9″ and fuse them to the back side of the outer fabrics. The fleece should be placed in the middle with 1/2″ on all sides.
Lay your zipper right side down along the top edge of your pouch front. Pin the zipper in place then baste it using a zipper foot. Next, place one of the lining pieces right side down on top of the zipper. Your pouch front and lining should be right sides together with the zipper sandwiched in between. Pin the lining piece in place and then sew along the zipper with a zipper foot. Turn the pieces right sides out, press and topstitch along the zipper.
With the front of your pouch facing up, lay your other outer piece right side down on top of it. Line the top of the outer piece up with the top edge of the zipper, pin and baste in place. Flip the pouch over so the lining you sewed in the last step is facing up. Lay the remaining lining piece right side down on top of it, line up the edge with the top of the zipper, pin and then sew in place using a zipper foot.
Flip the main and lining pieces you just sewed right side out, press and topstitch along the zipper.
This step is really important! Open your zipper!! Position your zipper pull somewhere in the middle, but closer to the closed side like shown below.
Place the two outer pieces right sides together and the two lining pieces right sides together. Pin around the edges. Starting at the bottom of the lining sew all the way around the pouch. Stop sewing about 3″ from where you started, leaving a hole in the bottom of the lining.
Turn your pouch right side out through the hole in the lining. Use a chopstick or other pointed object to push the corners of the pouch out. Fold the raw edges of the opening in and sew the hole closed either by hand or machine.
Tuck the lining down inside your pouch and you are all done! Woo-hoo!
Want more zipper pouches? Check out my blog for this cute embroidered zipper case, or this case the fits in a three ring binder, it’s perfect for back to school!
‘Til next time!
-Crystal
Check out Crystal’s blog here. Her darling shop here. Follow her on Instagram here. And her Pinterest page here.
***ALL contributor posts by Crystal, can be found HERE.

Hi, I’m Ashley—the DIY-enthusiast behind this crazy blog!