Ooooh, today I have a sewing tip for you……and it’s pretty darn cool! Also, it’ll save you some money (less fabric waste) and make your sewing life a lot easier.
Let’s talk for a second about Bias Tape. Have you used it much? Or at all? If not…..let me explain briefly what it is. Bias Tape is strips of fabric cut on the bias (diagonally cut across the grain of the fabric). And because it’s cut on the bias, it’s a bit stretchier and more flexible. It is generally used around edges of blankets, hot pads, neck lines, and so many more projects. (In fact, if you type “Bias Tape” into my search bar up in the upper right hand corner, a bunch of project will pop up that I have created using Bias Tape.)
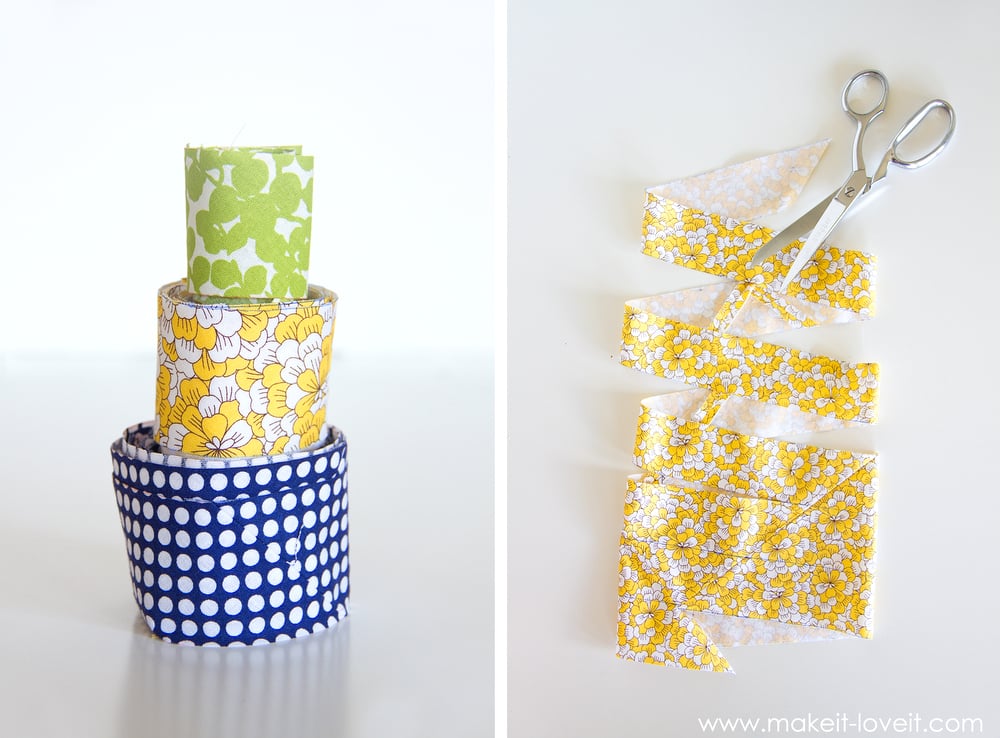
You can buy Bias Tape…..but if you want something in a color other than the standard colors they manufacture, you can easily make it. However, sometimes it take some time (and lots of wasted fabric) to make diagonal cuts into your fabric. But let me show you the coolest trick……by cutting it from one single square of fabric, all connected as one continuous strip of Bias Tape.
All you have to sew is 2 seams…..and then you start cutting around and around, resulting in piles of Bias Tape.
And just to make it a little more clear, an 8 inch square will produce about 29 inches of 2-inch wide Bias Tape…..with only 2 seams. This is perfect if you just need a little bit but don’t want to make a 29 inch diagonal cut into your precious fabric! Cool, right?
As a comparison, a 14 inch square of fabric produces about 94 inches of 2-inch wide Bias Tape and a 20 inch square produces about 191 inches of 2-inch wide Bias Tape. A standard package of Bias Tape usually has 3 yards of length, which is 108 inches…….so a 14 inch square produces almost the same amount.
All you need, is a quick visual to help you wrap your head around how those seams are sewn….and then it’s smooth sailing from there. And you can make Bias Tape with the smallest bits of fabric. Such a great technique!
Before we get started……there are a lot of pictures below, to help illustrate how this works. But after you have made this a time or two (and wrap your brain around how it works), you will whip bias tape out in minutes. And will be so glad you aren’t wasting fabric trying to cut full strips of bias cut tape!!
SUPPLIES:
***Check out my Sewing Terms 101 post, for additional help with terminology, etc.
First, decide how long of a 2 inch wide bias cut strip you need.
***These instructions are for making 2 inch wide bias cut strips, which will result in 1/2 inch Double Fold Bias Tape. If you need something wider or more narrow, you’ll need to recalculate. For example, if you want to make 4 inch wide cut strips (that will create 1 inch wide Double Fold Bias tape)….you’ll need to cut a square that’s in multiples of 4’s, plus a 1/2 inch added on for a seam allowance.
***Also, I’m sure there’s a much more mathematical way to figure out the exact length of Bias Tape that a particular square of fabric would produce (other than just measuring it, like I did)….but that hurts my head. And since bias tape stretches, that number may vary as you’re measuring anyway. So, consider making a slightly bigger square if you’re worried about not having enough.
Okay, let’s get started!
Cut your fabric square (whatever size you’re needing) making sure that it’s an actual square, with 90 degree corners. (Need help cutting your fabric perfectly straight??)
Draw a diagonal line across your square (front or back of fabric…doesn’t matter), just like below, from one corner to the opposite corner, using your ruler.
Then mark an X at the very top of the fabric and the very bottom of the fabric……and then an O on the right side of the fabric and the left side. These will be your guides for matching up the fabric later on.
It’s hard to see in the image above…..but the marks are there. :)
Now, cut along the diagonal line you made.
Now, with RIGHT sides together, match up the two edges that have the X on them.
A small tip of the bottom piece should hang over on the left side and a small tip of the top piece should hang over on the right side. Just be sure that the layers of fabric are arranged so that both tips are hanging over the same amount.
Sew the two layers together with a 1/4 inch seam allowance.
Open up the fabric and iron the seam open along the back.
Turn right side facing up…..and you can see you have a nice parallelogram. Cool, right?
Okay, now you want to start making some lines on your fabric. It doesn’t really matter if you mark on the front or back of the fabric…..because you’ll cut along the lines and you’ll probably be folding them under to make bias tape. So, you’ll never see them. [However, it’s actually easier to see the lines if you draw them on the back of the fabric for when you start lining them up (several steps down)….but I drew them on the front of the fabric, so that I could show cutting the strips from the front side of the fabric, way down at the very end.]
Now, be sure that you are making lines that are PARALLEL to the longer edges of your parallelogram…..and use your ruler to draw lines that are 2 inches apart.
Continue until you have lines all the way across your fabric.
Depending on if you fabric stretched while ironing or if your square measurement was a tiny bit off, you may have a little extra left over. That’s okay…..just trim it off.
Now…..here’s where the magic happens.
Place your fabric down in front of you with the RIGHT side of the fabric FACING UP. Then, fold the two longer tips back into towards the center, creating a square shape. If you keep the sides even, you will see that the drawn lines actually line up with each other. (My lines are a little harder to see them because I drew them on the other side…..but you can still see them.) See how the red arrows are lining up? And so are all the other drawn blue lines? Well, you actually don’t want them to.
What you want to do is pull the upper triangle tip on the left and pull it slightly over to the left….and then pull the lower triangle tip over on the right, and pull it slightly over to the right. Keep pulling until the lines have all shifted over one line….and re-aligned with the next line. See how the red arrows are now shifted over one line?? That’s what you want.
The very last line on both sides, will line up with the fabric edge below it.
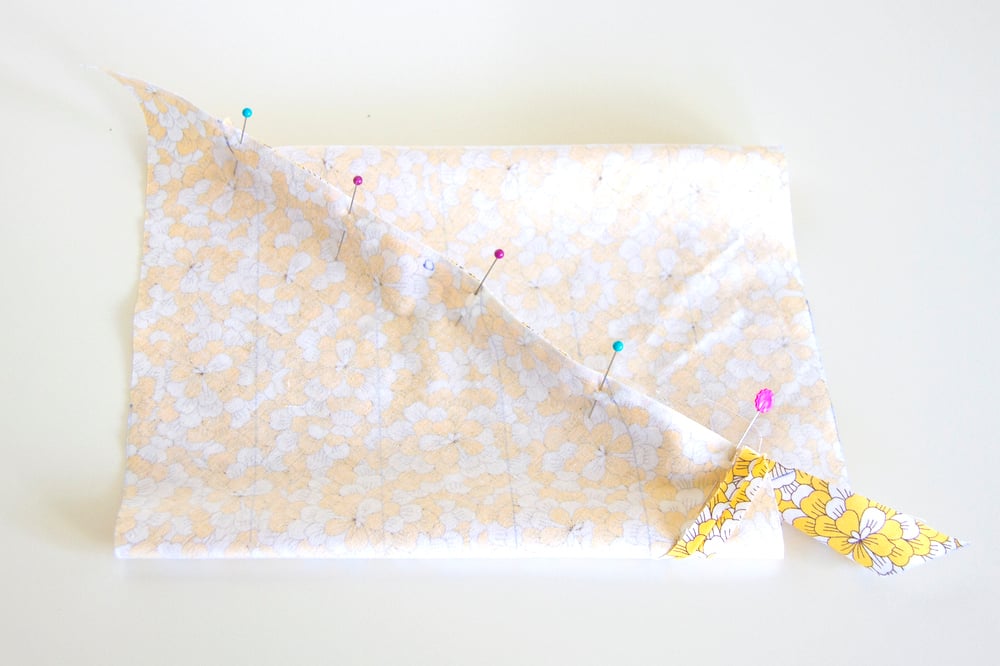
Now, keep those lines shifted over one line and lined up and grab the two edges of fabric and try to force that edge to face each other, with right sides together.
It will feel a bit awkward since the fabric is shifted and cut at angles…but do your best to line up these edges with each other.
Now, you are trying to keep the drawn pen line from the front layer of fabric together with the pen line on the back layer of fabric …..but don’t try and line them up exactly. You will notice that the lines are going in different directions, and you want them to intersect 1/4 inches down from the fabric edge. And once you do that, the spot where the lines end on the very edge of the fabric, won’t line up with each other. They should end slightly apart, like shown below.
Now, in order to have one continuous line once you turn the fabric right side out, you must be sure that the two lines are intersecting (where the red arrow is pointing down below) right at 1/4 inch down from the top edge. The grey dotted line is just showing where the draw line is on back fabric layer.
To test your fabric placement, place a pin 1/4 inch down from the edge and take a peek from the other side of the fabric.
If you place it down in front of you, you’ll see that your drawn lines are now making one continuous line. See that? That’s because you let the lines intersect 1/4 inch down from the top edge.
If you try and line up the lines along the very top edge of the fabric (and not 1/4 inch down), and then sew it together, it will look like this….and your lines won’t be lined up.
Once you have the first pin in place, the rest of the lines should be easy to pin. But check each one, just to be sure. When you reach an end, the very last line will intersect with the edge of the fabric. Just be sure that the final line intersects with the edge of the fabric, 1/4 inch down from the top edge…..just the same way as the others.
And there you go…..your pins should all be in place. Now, sew right along the pinned edges, 1/4 inch from the edge.
And then do your best to iron this seam open….trying to not add any extra extra creases to your fabric.
Now, if you drew your lines on the WRONG side of your fabric…..you’ll start cutting from the WRONG side of the fabric, but since I drew my lines on the RIGHT side of the fabric, I turned my tube of fabric right side out…..and then started cutting along my drawn line.
Now, the cool thing is that the line will now continue around, and around, and around……..and will result with one continuous long strip of fabric.
And yep, it’s all cut on the bias — SO COOL, RIGHT??
And yes, you’ll have seams connecting fabric pieces together…..but they attached at a diagonal (which is the best way to attach bias strips) and they’re already all ironed flat, since you did that earlier.
Pretty awesome, right??
Now practice it a few more times……and then you’ll use this technique every single time!
Enjoy!
-Ashley

Hi, I’m Ashley—the DIY-enthusiast behind this crazy blog!