The day my kids go back to school after winter break is when the New Year officially starts for me. Because while they’re still home, I’m still in vacation mode. The routine is off, everyone stays up later, we play a little harder, watch more movies, eat more treats, and everyone sleeps in a little later (hallelujah!).
But today is the day that the kiddos start back to school. So, 2015 starts TODAY for me. Happy official New Year, friends!! :)
And what’s a new year without a few goals?! I haven’t written anything down but I have a few things I’ve been stewing over and trying to improve from last year. Okay wait, let’s be real…..I’m still trying to work on 2014’s goals. And 2013’s, for that matter. Baby steps, though, right? ;)
Anyway, one of my short term goals is to finish the pile of half-finished projects that I have sitting in my craft room. There are several of them that I was really wanting to finish before Christmas. But well, a tornado hit my house in December (a figurative one) and I’m still trying to figure out where that whole month went.
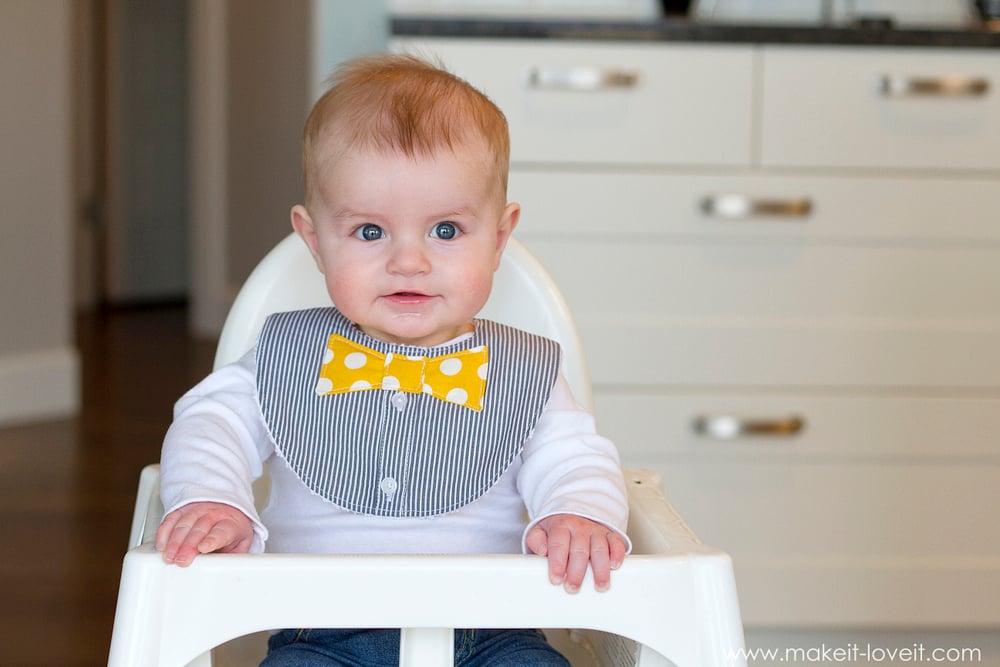
So, the first unfinished project that I rescued from the debris of my craft room?? Little DROOL BIBS for Oliver. Because this baby of ours has a leaky faucet for a mouth!
These bibs are made from old button-up shirts of Steve’s that I have hoarded over the years (for who-knows-when-I’ll-need-them occasions such as this). And rather than covering up a cute baby outfit — these pretty much MAKE the outfit!
If you have a drooler, then you know the aggravation of which I speak. A soaking wet shirt, spits marks on everything, rashy skin beneath the wet clothing, etc.
And just to help prove my point, Oliver started drooling right on cue. (Ha. I love this squishy little boy……even if he is a drool ball!)
And because I knew one new bib wasn’t going to cut it, I made 3. All with different little bow ties!
Go on buddy….drool all you want!
For the closure, I added a very simple snap, but you could easily attach Velcro if you prefer.
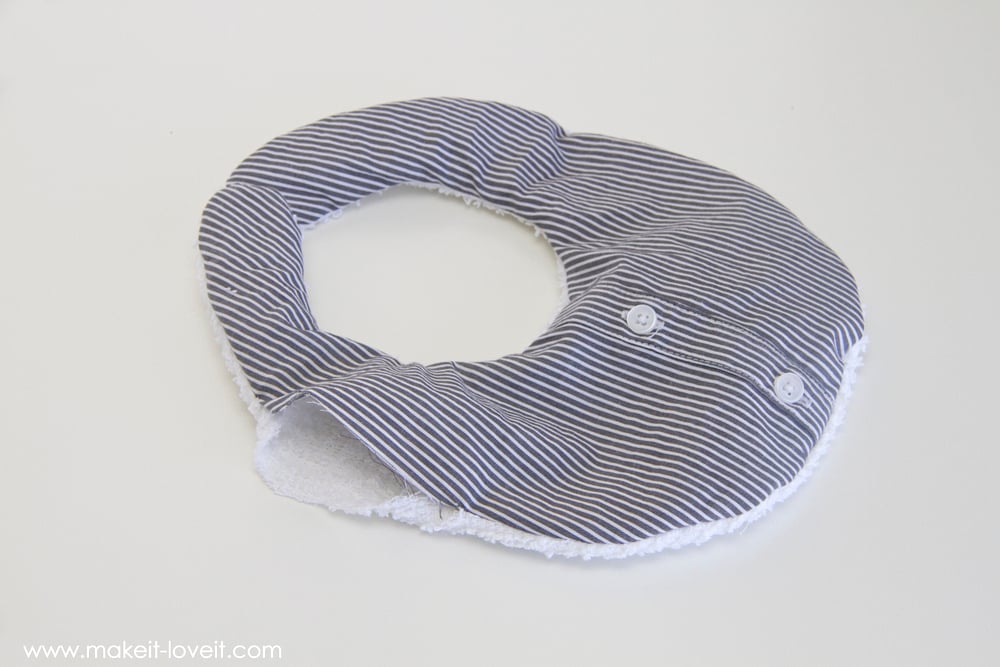
The front of each bib is cut from a button-up shirt and a bit of scrap fabric for the bow tie, just because it’s cute. But the back has a layer of absorbent terry cloth, to help up soak up the drool. Cute AND functional!
So the entire thing is soft and comfy…perfect for baby skin!
Oh, and don’t worry about those little bow ties — they are securely sewn to the bib, around all the edges. So they’re not going anywhere. :)
Okay, so for those of you who think there aren’t many cute little accessories for baby boys (don’t worry…I agree) — this one’s for you! Even if your little guy (or someone you want to make this for) doesn’t drool much, you’re going to need to make one (or more) of these anyway…because holy smokes, they’re just too cute! :)
***In case you’re wondering, YES, I do munch on this little kid All. Day. Long. How could I not?!!
asdf
Okay, let’s get started and gather a few things!
Supplies:
Print out your bib pattern piece and use to trace around your fabric that is folded in half (as directed on the pattern piece). OR, trace the bib pattern onto a full sheet of paper to create a full bib pattern piece.
Then place your pattern piece on top of your shirt fabric and center it down the front of the shirt. Cut around your pattern piece.
***I actually sewed the opening of the shirt closed first, just to be sure that the button placket never opened.
Repeat with your terry cloth fabric. (However, I found out later on that it’s actually better if you cut the terry cloth piece about 1/2 inch larger around all edges because terry cloth is a looser weave and it tends to unravel. So adding more fabric around all the edges will make things easier when turning right side out and manipulating the fabric.)
Now, place your shirt piece and your terry cloth piece together, with right sides together, and sew together using a 1/4 inch seam allowance around the shirt fabric edges. However, leave about a 3-4 inch opening along one side for turning your bib right side out.
Turn the bib right side out through the opening.
Then tuck the opening towards the inside 1/4 inch, pin in place, and then iron the entire bib flat. Then top-stitch around the entire bib, about 1/8 of an inch from the edges.
***And at this stage, it’s also recommended to be sure your buttons are securely attached….and to add several more tight stitches if needed. Baby clothing does have buttons on it so there’s no need to remove them, but it’s always a good idea to make sure they are very securely attached!
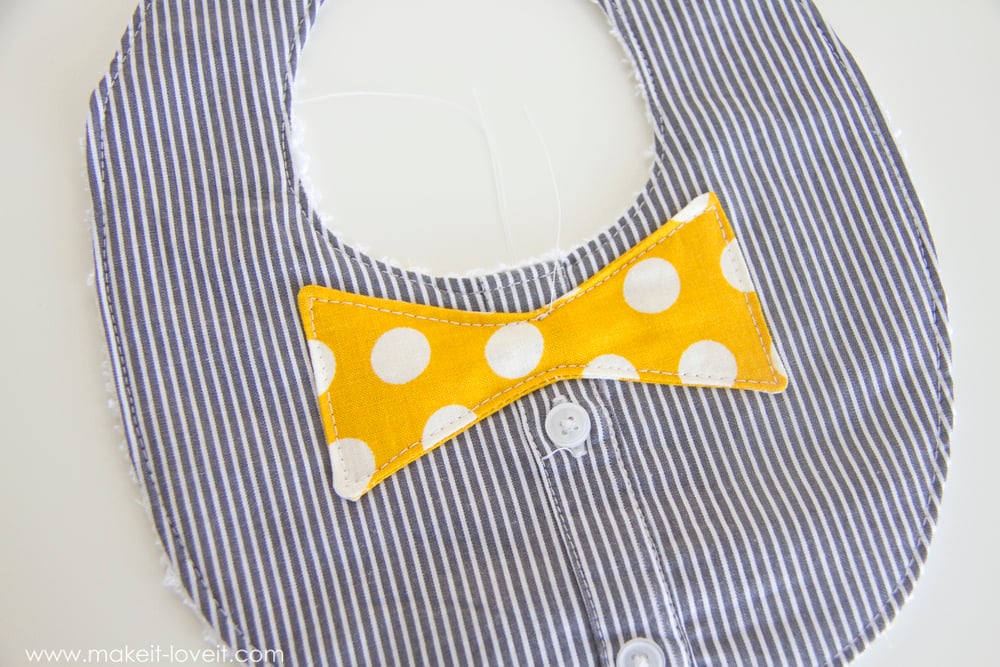
Next, cut 2 Bow Tie pieces and 2 Bow Tie Center pieces from your fabric.
Place them together with their corresponding pieces, with right sides together, and sew all the way around both, using a 1/4 inch seam allowance.
Then trim off the corners of both pieces. (more info on cutting corners and curves here)
Then, make a slit along the back layer of fabric (making sure to not cut through the front layer of fabric)…
…and then turn each shape right side out through the slit you made. Poke out the corners with a pencil or another similar object.
Then iron each one flat.
Now, place the Bow Tie shape onto the bib (with the slit facing down) and sew around the entire shape. Then, place the Bow Tie Center piece on top and sew around that as well. (Sorry, I forgot a picture of the center piece sewn in place.)
Lastly, add your snap pieces to the ends of your bib. (How to attach snaps HERE)
And that’s it! A super cute Bow Tie bib……ready to place around your little drooler’s neck!!
Enjoy!
-Ashley
. . . . .
Need a few more Baby Boy project ideas??
Take a peek at this darling Faux Vest Onesie…with Interchangeable Bowties
Or how about this Little Guy Neck Tie pattern…..so cute in a variety of colors!
Or maybe you know of someone with a small baby who would enjoy using these light and breathable DIY Gauze Swaddle Blankets
. . . . . . . . . . . . . . . .
Featured Sponsor:

Hi, I’m Ashley—the DIY-enthusiast behind this crazy blog!