UPDATE: All of the Wizard of Oz DIY Costumes are done and can be viewed by clicking the link!! Enjoy!
Great news…..THE PAINT DRIED! Wow, it must have been something in that metallic paint that really slowed down the process, because that took DAYS. Weird. But now you know, if you make something similar…..plan ahead!! (After yesterday’s post about the wet paint, a commenter mentioned sprinkling baby powder on tacky [not wet] paint and letting it sit for a few hours and it takes the tackiness away. I had my powder in hand and went out to the garage last night….but surprise, the paint was dry! Thanks for the tip though Amanda!)
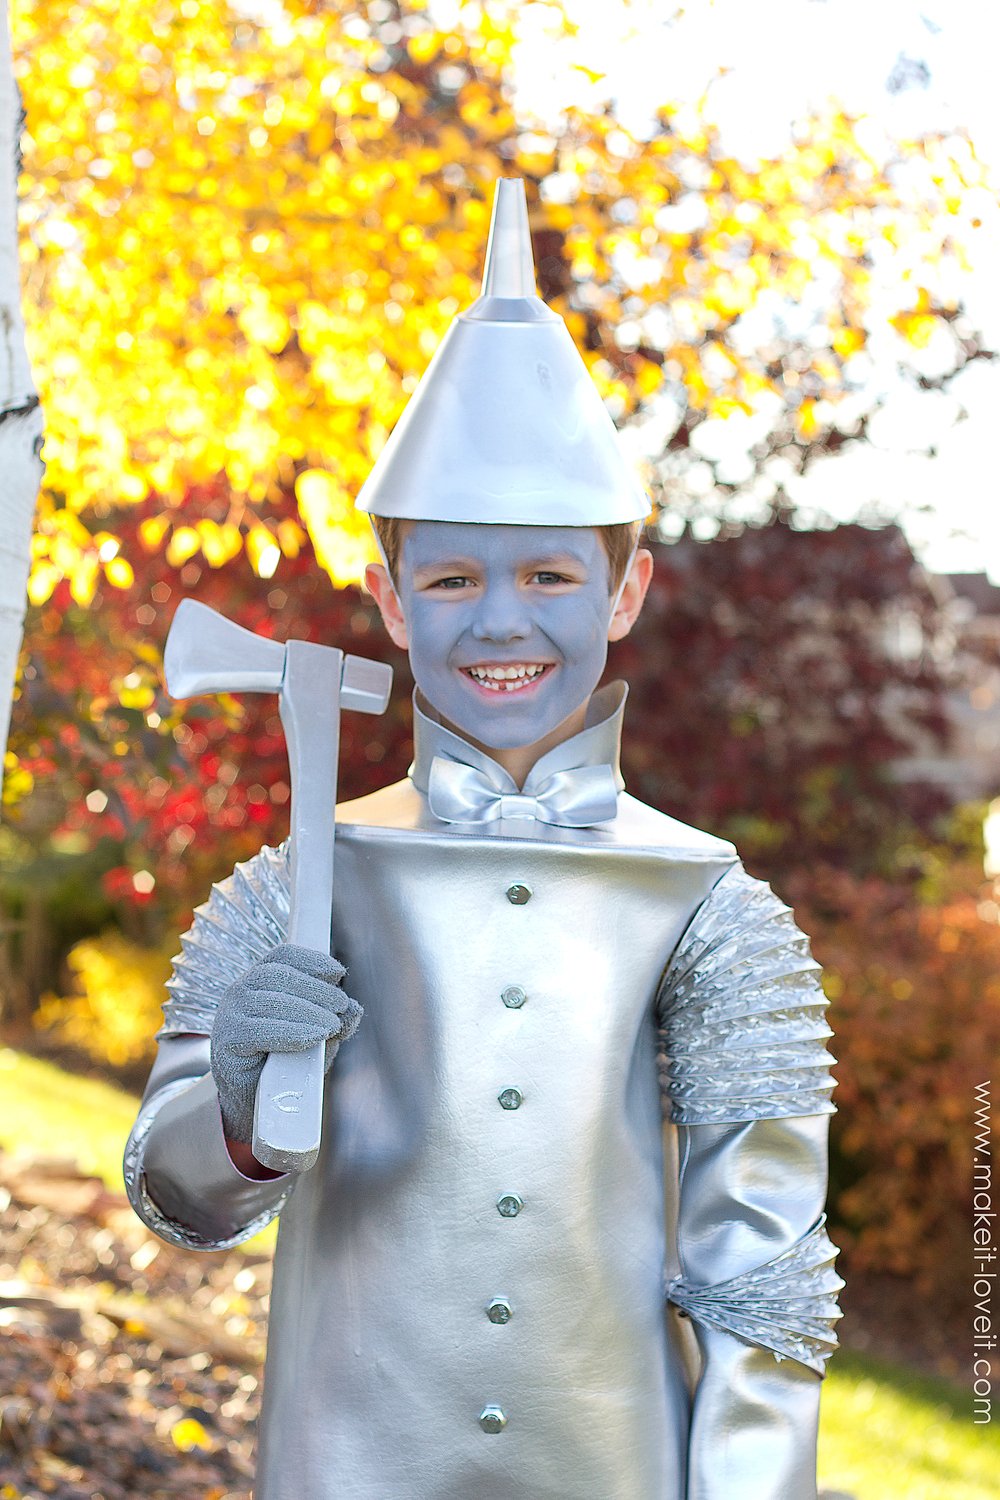
Anyway, Connor was SO excited this morning when I told him his costume was finally dry. It has been hanging from strings attached to the garage ceiling since Saturday night and every time we walk past it to get in the car, he would gently touch it to see if was dry. Nope, nope, and nope. Tacky. Every. Time. But this morning, right when I woke him up and told him the good news, he hopped right out of bed, excitedly put every single piece of the costume on, happy-chattered the whole time I put the silver paint on his face……and bee-bopped right out the door to snap a few pictures.
This kid, my gosh, he could hardly keep from giggling. He makes such a rad little Tin Man!!!
And plays his part really well. Hah…..he cracks me up!
And let me be really honest for a second……I was actually kinda bummed with how this costume was turning out about halfway through making it, all the way until painting it. I had several ideas in my head that I just couldn’t execute, and well, I’m totally my worst critic. However, once it was painted, it pulled the whole thing together much cooler than I thought it would. And even better, once Connor put the entire thing on, his excitement and sweet little smile turned all those visions that I couldn’t quite figure out, into nothing but dust. THIS face made me remember why I love making costumes…
From the very beginning, Connor was most excited about the axe. A weapon, go figure. But, he remembered that the Tin Man was very serious about using his axe and tried chopping down our tree.
And you’ve probably figured it out by now, but the shoulder, elbow, and knee joints are covered with dryer vent flexible tubing. It worked great and gives him mobility.
The “barrel” of the costume bodice is nice and rounded and holds its shape really well. It actually has some stiff tubing around the top to keep it nice and round. And the fabric? It’s vinyl. So it’s stiff and mimics a “metal” look, while still being really comfortable and not one bit heavy, like real pieces of metal would be.
You better believe that I added a little bowtie, just like the real Tin Man. And cut the tops off of bolts and glued them down the front of the barrel, to also mimic the original look.
Oh, and of course, an upside down funnel for a hat with a piece of elastic strung through it and under his chin, to hold it on his head.
The back of the “barrel” has a long strip of sturdy velcro keeping it closed, as well as little tabs of velcro keeping the top of the barrel and the collar closed in the back. Once you open it up the velcro and slide open the hoop, he slides his arms out and takes it off, just like a button-up shirt…but backwards.
I actually went back and forth with the idea of creating a full pair of vinyl pants. But, I kept getting hung up on the idea that vinyl pants would be really stiff and hard to bend in and move comfortably at the hips. And you know how the real Tin Man has different metal pieces in the hip area to help him move? Well, I count this different fabric section at the hips, similar to the Tin Man’s. But if you look closely, that’s a pair of sweat pants under there, that the vinyl legs are sewn to, and then spray painted to match as closely as I could. And while I was at it, I spray painted some simple little gloves to cover his hands.
I’m so happy this kid was so thrilled to be the Tin Man this year. I’m afraid this may be the last year he’ll agree to join the other kids and do a family theme.
In fact, I overheard him tell Elli a few weeks ago that he changed his mind and wanted to be a ninja this year. I asked him if that’s what he really wanted to be, because it would be reaaaaaally easy to make. No problem. Ninja? Done. But I told him I wasn’t going to make both the ninja and the Tin Man…..and that he had to choose. He looked over at Elli and Chloe, looked back up and me, and said, “No, the ninja doesn’t work with Dorothy and Glinda. I want to be the Tin Man!” Whew…..close call. ;)
This kid. He has gotten so big lately and is trying to figure out his own little identity. But I’m glad he still thinks it’s cool to jump into this huge world of imagination with his sisters. Whew, one more year, one more year… :)
Okay, ready to start putting the Tin Man together???
But wait, before we get started, here are some of the pieces for the costume that I used, but didn’t actually make or need to create a tutorial to explain them.
Okay, now onto the costume. Just keep in mind, amounts will vary, depending on the size of your subject.
Supplies:
**The vinyl I used is all different colors because it’s what I had. I little bit of this and a little of that. Hey, I was just excited I was making most of this costume from stuff I already had. :)
**UPDATE: after wearing the costume to a few parties and trick or treating, the spray paint started chipping and peeling off. GRRRR! So, if you can find metallic silver or even grey vinyl to use, buy that instead. It will save your sanity!
Okay, let’s get started!
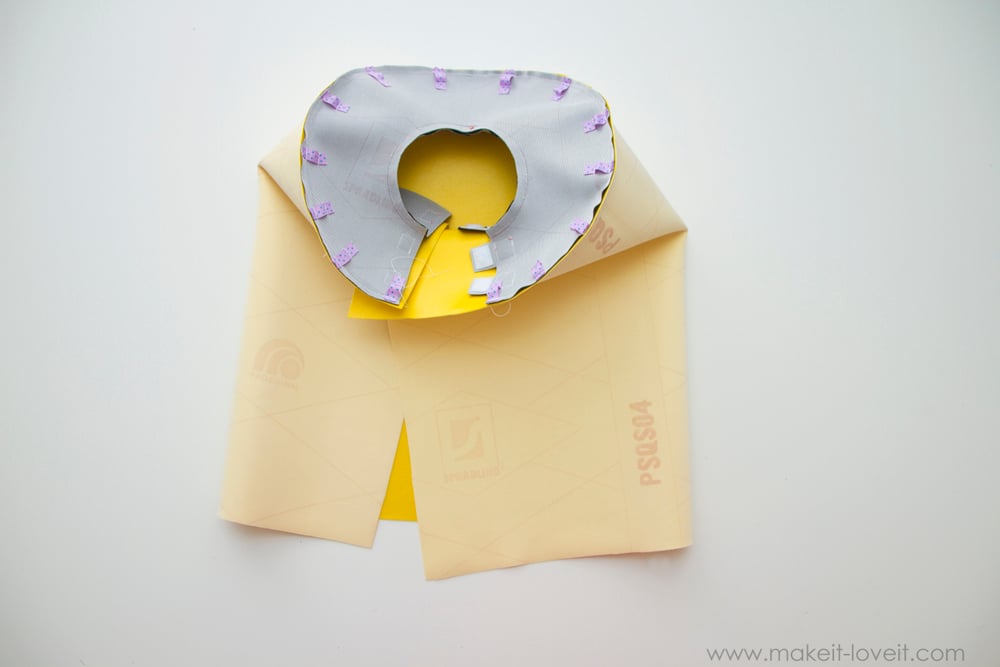
First, we’re going to make the barrel section of the costume. So measure across your subject, from the edge of one shoulder, over to the other should. Then, cut a circle from your vinyl that has the same diameter as the shoulder width measurement. (Add an extra 1/4 inch all the way around for a seam allowance.) Then cut another circle out of the very middle of your circle, that is the same measurement as your subject’s neck (plus a little extra room for comfort). Then cut a line straight out from the smaller circle to the outer edge of the larger circle. (This cut will allow your subject to get his/her neck into the costume……so it will be at the very back.)
Now, you need 2 collar pieces. Be sure that the inner curve of each piece is a larger curve than the curve of the inner circle. That will help it stand up off of the barrel and look like a collar. (But if it’s a straight line, the collar will stand up too straight.)
Then, place one of the collar pieces face down onto the circle and match up one end with the very front of the circle. (Remember, the back is where the slit is, so exactly opposite the slit is the front.) Sew the collar to the inner circle, using a 1/4 inch seam allowance. (If your collar piece is too long, it’s totally fine….so was mine.) Attach the other collar the same way.
When your collar pieces are attached, they should stand up at an outward angle.
Trim off the excess fabric from both collar pieces, so that they meet up evenly in the back.
Then, cut a rectangle piece of vinyl and attach one side to the left side of the collar.
On the other half of the rectangle vinyl piece, sew on a piece of velcro. Add the matching piece of velcro to the other collar edge.
Do the same thing to the flat circle (which is the top of the barrel), so that it will close nicely. (Just be sure you stay at least 1/2 inch from the outer circle….because you’ll be sewing that edge to the rest of the barrel.) When sewing two curves that are different angles, just sew bit by bit, adjusting your fabric and needle as you go, and keeping the edges even.
Turn your circle over and sew pieces of ribbon to the outer circumference of the circle, spacing them ever 2 inches or so. Give each piece of ribbon a little gap and make sure that your tube fits inside nice and snug. This will be your casing for your tubing.
And just be sure that you sew the outer edge of the ribbon about 1/4 inch from the edge of the vinyl so that once you sew this to the rest of the barrel, it won’t make the opening in the ribbon any smaller. (I also heat sealed each of my ribbon ends with a lighter, so that they wouldn’t fray.)
Now, place the neck piece of the barrel onto your subject because you’ll need to measure for the next piece.
With this neck piece in place, determine how long you want the barrel section to be (and add a 1/4 inch). And then measure around the the circumference of the circle to see how long of a piece you’ll need to create the barrel……and then add a few inches, for the velcro overlap (Plus, I always add a little more, just to be sure, and then I can trim down later). Cut this rectangle piece out and attach it to the circle, sewing right sides together (and using a 1/4 inch seam allowance). Be sure to leave the overhang of fabric at one end for the velcro.
Yes, I had plenty of overhang, but better safe than sorry. Trim of the excess overhang down to about 1 1/2 inch of overhang.
Now, slide your tubing into the ribbon casing and trim it down to size. Then, cut a piece of threaded rod down to about 2 inches. Then place it in one end of the tubing. If it is really tight and won’t budge after you get it into one end halfway, great! If not, add some glue so that it will always stay in the one end of the tubing.
Now, make sure that the other end of the rod will go in easily to the other end of the tubing. (We drilled out the inside of this other end of the tubing very slightly, just to help the rod slide in easier. But don’t drill out too much because you still want it snug…..just night tight.)
Once you slide it all together, you have one continue tube.
Now, take out the tube and attach the 1 inch wide velcro to the wrong side of the overhanging edge of vinyl and to the right side of the other edge of vinyl.
Now, cut out oblong arm holes in both sides of the barrel, about 1/2 inches from the top of the barrel. Just be sure that the arm holes are big enough for movement, but not too big…..or they’ll be too big to cover.
Cut 2 rectangles for the sleeves that are a little wider at the top (because the upper arm is bigger around than that wrist). If you’re not sure about measure or cutting a sleeve, check out some of my clothing tutorials. However, you don’t need the upper portion of the sleeve that would cover the should…..so you won’t need these pieces to be quite as long as normal. (Measure from right under the armpit, down to the wrist and that’s how long you’ll need. The width will depend on how big around your subject’s arm is……and you also want enough room for movement.)
Fold each sleeve in half lengthwise and sew into a tube. See how the upper part of the sleeve in the picture is slightly wider? That’s for the upper arm.
Now, this is just to help the vinyl lay flat from the outside but try and fit the tip of your iron on top of these vinyl edges and iron them flat the best you can. BUT BE SURE to place a piece of fabric over the vinyl and under your iron….otherwise the vinyl will melt.
Turn each sleeve right side out.
Then cut some of you dryer vent tubing for the shoulder and the elbow and slide them onto the sleeve. The shoulder section will be a little longer since it has to curve up and over a shoulder. And for the elbow piece, I pinched the folds closed where the inner elbow is and then wrapped thread around it several times to keep it in place.
Attach these pieces to the sleeve with a needle and thread. It’s hard to see but I tacked it around the top and bottom edges of the aluminum tube in several place. (But the tubing for the shoulder is only attached along the bottom edge of the tubing. And the sleeve is tucked under there about an inch.)
Then attach the other end of the shoulder tubing to the arm hole you cut out from the barrel, with a needle and thread as well. If there’s a gap at the bottom (where the armpit is, it’s okay, you’ll never see it).
Then cut a narrow rectangle from your vinyl and pinch the center, creating a bowtie shape. Wrap a smaller piece of vinyl around the center to keep the pinch secure. Glue in place along the back.
Glue the bow tie to the top of the barrel, right in front of the collar.
Now, grab the pants and measure around the legs. Cut pieces of vinyl that will fit all the way around the pants, including some for a seam allowance. Sew the vinyl into tubes, iron open the edges from the inside (just like you did with the sleeves above) and then turn right side out. Slide each tube onto both pant legs and sew along the upper edge of each tube, securing them to the pants.
For the knees, the dryer vent tubing wasn’t large enough to slide over the pant legs. So I cut each section of tubing open along the back side. Then I bent it so that it would stay open like in the image below.
Instead of stitching these pieces to the vinyl, I hot glued them instead. It held up really well but I had to turn the glue up to the HOT setting. But you decide what you prefer.
Now, it’s time to spray paint. (You could have spray painted pieces of vinyl first, waited for it to dry, and then constructed the costume…….but I didn’t know how much I would need and I wanted to keep my scrap pieces of vinyl in the colors that they were.)
For ease of painting and drying, I hung the bodice piece on a small kid-sized hanger and then hung it from a string that we attached to the ceiling of our garage. We hung two more strings from the ceiling that had hooks on the ends and hooked them under the end of each sleeve, holding them away from the bodice. We hung the pants the same way, but used a pant hanger.
Like I mentioned above, the Rustoleum metallic paint took about 2 1/2 days to dry. And that was even with a fan pointing at it for half that time. So plan ahead and let the paint dry completely.
UPDATE: after wearing the costume to a few parties and trick or treating, the spray paint started chipping and peeling off. GRRRR! So, if you can find metallic silver or even grey vinyl to use, buy that instead. It will save your sanity!
After the paint is completely dry, add the bolt head “buttons” down the front of the barrel with some epoxy glue.
And that’s it. Your Tin Man is ready for trick-or treating!! :)
Good luck!
-Ashley
. . . . . . . . . . . . . . . .
Featured Sponsor:

Hi, I’m Ashley—the DIY-enthusiast behind this crazy blog!