Once you walk in the front door of our house, our living room is off to one side with tall vaulted ceilings. I really love the spaciousness of the ceilings but from the very beginning, I have been really stumped with how I was going to fill that main wall. For several months, I had two little shelves with frames on them and a big round mirror. (Remember when I made Custom Couch Legs? There’s a peek of the old decor in that post…but they still didn’t have pictures in them.) But, I always cringed when I walked in there. The pictures were too small and I don’t know…..I just didn’t love the whole set up. It was like the wall swallowed up those itty bitty frames. That’s when I finally realized that I needed really big things in that space. But I didn’t just want a big piece of art from the local home decor store. I wanted something a little different.
I have seen these “home state” pieces of art around and have always thought it would be a cute addition to a mantel or a shelf…….but kinda laughed while wondering whose state would “win”, if I ever decided to make one. Then, I began thinking about the places Steve and I have lived and how all of those places and the people we knew at each, really have helped shape who we are…..both individually and as a family. Each of those places have been “home” in some way, even though not all of them were for very long. (And if I sit here and type about them long enough, I’ll probably get a little mushy and start looking up flights to visit old friends and favorite landmarks. So……I’ll stop. Because remember, I’m pregnant? And I’m always seconds away from full on sobbing.) So yes, each of those places are pretty dear to us……so I figured we needed ALL of them.
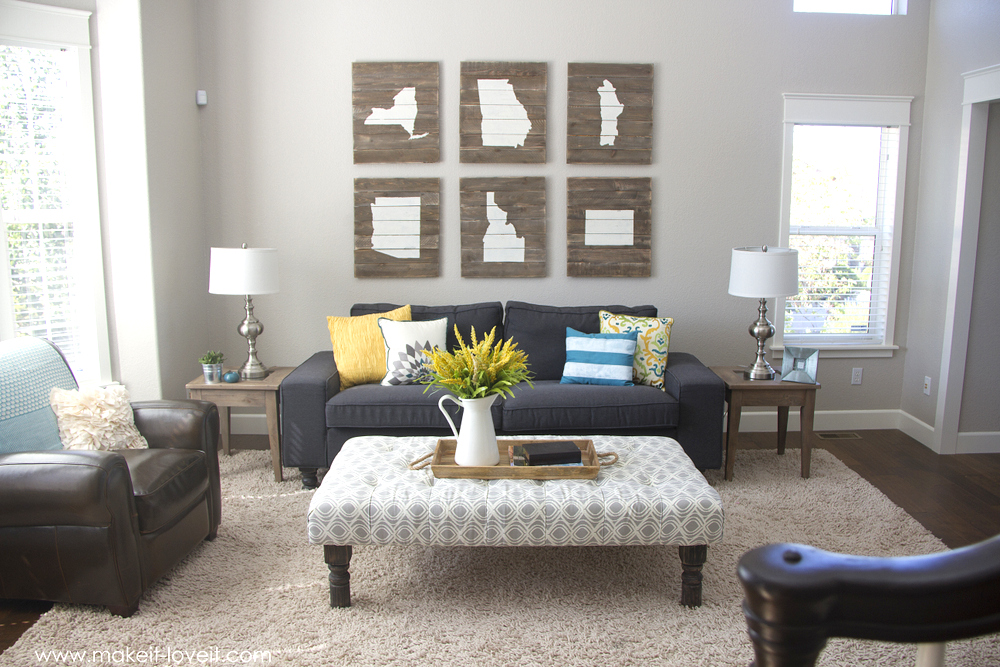
Hmmmm……but where to put all those states?? Oh yeah, I have a really big and empty living room wall that needs some really big — but simple art. So, that’s what I did.
It kinda helps pull everything together and really helps fill that big ol’ wall.
And now……this living room is mostly done. The window trim—check. Floors installed—check. Baseboards—check. Tufted Ottoman—check. (ooooh, that’s another fun project, I’ll share another day!) Oh wait, we’re just missing a chair to the right of the couch. We just haven’t decided on what to get. And that leather chair to the left of the couch isn’t staying…..I just pulled it up from the basement, until we decide on some chairs for this room. Bur whatever, it’s MOSTLY done in here. :)
**And did you spy some of the banister stained? It used to be orange-y oak, remember?? Yeah…..this section is done. The rest of the project stalled while doing other things. But once it’s done, I’ll share more.**
And okay, just for fun…..here’s a before/after picture. Because it’s always amazing what a little paint can do. (Haha….and a few other things!) But this was right when we moved in, a little over a year ago. (Wow, I kinda forgot how it looked until just now, when I dug up this photo.)
Okay, back to the art on the wall.
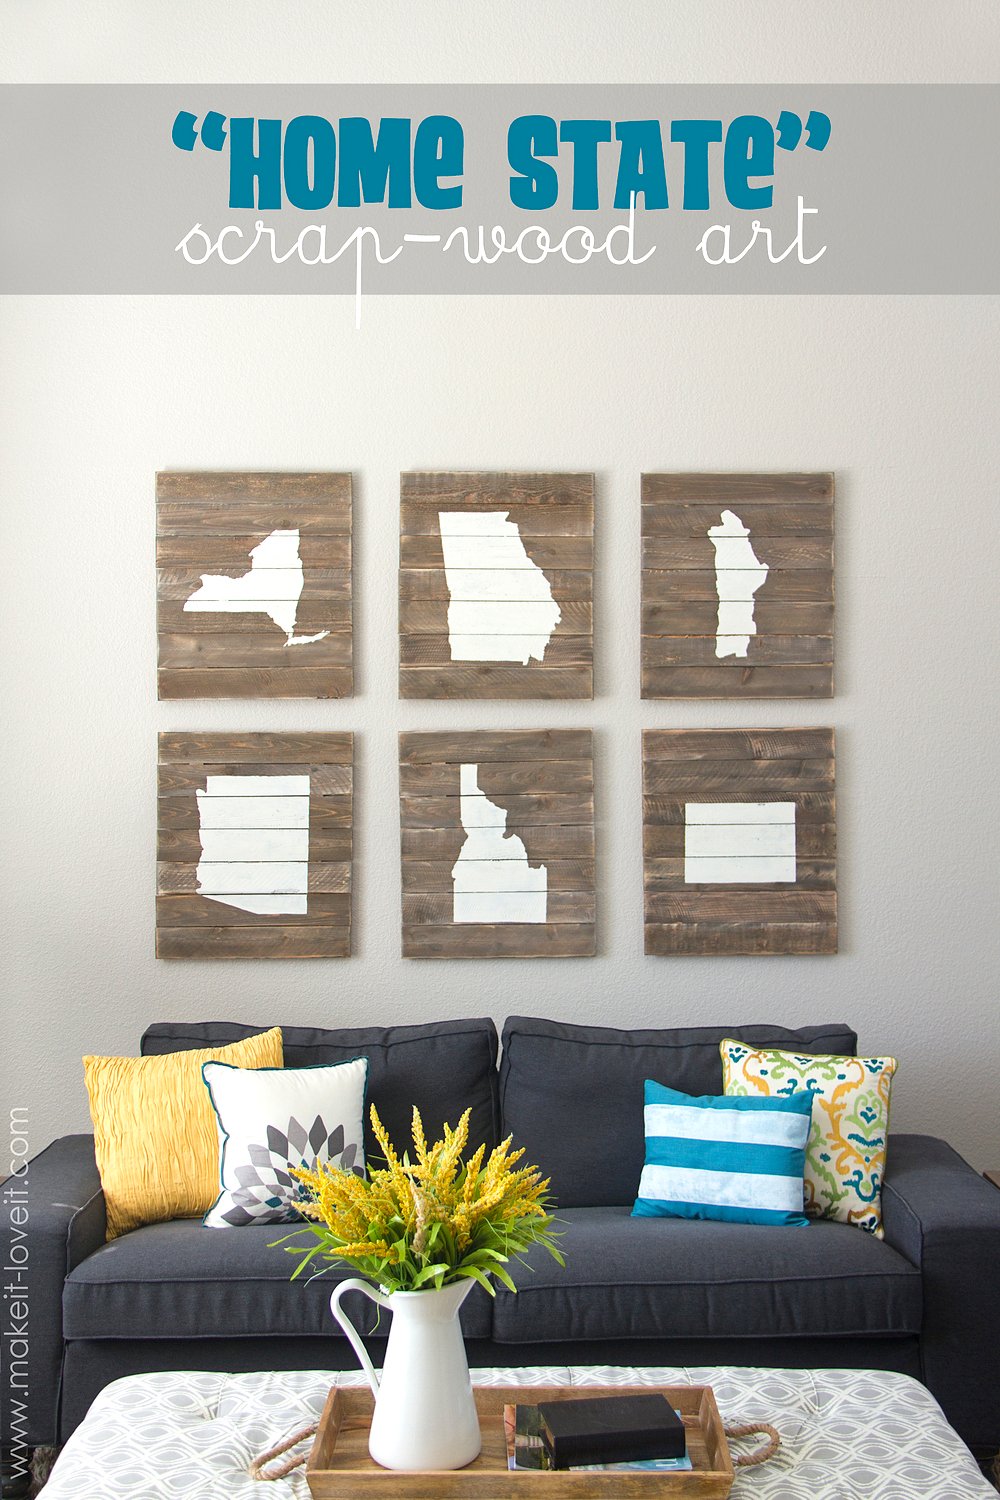
Nice weathered looking slats of wood, that pop off the wall slightly. Oh, and no, this isn’t wood from old pallets. I “weathered” them myself (more on that below) and made all 6 states for about $25. Pretty cheap art, right??
Geography time. Can you name all of those states on our wall?
Oh shoot, is that one in the upper right hand corner throwing you off? It’s okay…..because it’s not a state. Ha. It’s actually the upper region of Chile, where my husband lived as a church missionary for 2 years. That piece of art stumps everyone. :)
Other states: Arizona (where I grew up), New York (where I was a spanish-speaking missionary in Poughkeepsie, Yonkers, and Manhattan), Idaho (where Steve grew up, where I went to college, where we met/married, and where Elli and Connor were born), Georgia (where we lived for 2 years while Steve went to grad school and where Chloe was born), and Colorado (where we live now).
I have to say, the older I get (I know, I’m not that old yet…..but I’m getting up there at 33), the more I enjoy things around me that have some meaning. When I stare at these outlines of places we have lived, my memories transport me to really great things that have happened in my (and our) life. And that makes me really happy.
Oh, and in case you think I took down our family photos and tossed them, just because they didn’t fit the “look” of the living room…..haha, I didn’t. I hung them up in the formal dining room. Family photos saved—whew!!
They look much better on this wall, with a lower ceiling.
Love this little family of mine. So happy our home is coming together, piece by piece.
And I’m extra happy I can check this room off of the “must-do-before-baby-arrives” list. Well, except the whole chair thing…..but that can wait. (Are any of you moms out there as neurotic as I am at the end of your pregnancies? I have an actual “before-baby-arrives” list hanging up on the wall in our office and Steve knows if he really wants to help me out with something, he checks something off the list. I also find really weird surges of late night energy to get things checked off the list too, even as large and uncomfortable and swollen I am. Because, once baby arrives, all I want to do is sit/hold/smooch/cuddle our little wee one. So, for the love, I need more checked off my list!! ;) )
Okay, time to head to the store and buy some wood.
When I looked for wood, I knew I didn’t need anything super nice. In fact, I knew I wanted something a little rough, uneven, and even jagged. I found some cedar fence slats for $1.46 each……and they were perfect. So, I’ll share the dimensions of those, in case you look for and find something similar. But really, anything would work.
So, here’s what I needed for ONE state, which measure 21 inches wide and about 25 inches tall.
Supplies:
Now remember, your particular dimensions may vary a bit but I cut 7 pieces from my fence slats, that were 21 inches long each. I placed them all together, side by side. Then I cut two of the 1 1/2 x 3/4 inch pieces of wood, about 22 inches long each, and placed them along the two ends of the rows of slats, on the BACK side. Then, I nailed those pieces of wood right into the slats of wood. (Here’s a picture of the wood on its side vertically.)
Then I turned over my wood piece and decided to rough it up a bit more. Here are a few tools that I used.
And with the screw, I laid it on its side and hammered along the grooves as I slowed rolled it across the wood.
I also chiseled off the ends a bit, to make them look a little more uneven.
And you know, my wood was already pretty rough, so I didn’t really need to do much to it. Just little things here and there. But if your wood is a little smoother, you may want to scratch it up a bit more.
Next, the color of the wood. I decided that I wanted a warmer tone with some grey in it. I didn’t want it super brown but also didn’t want a super grey color either (because the color on my walls is a grey color). So, I warmed up the wood first with some walnut colored stain…..but I watered it down so that it wasn’t super dark and also didn’t seep too much into the wood. I still wanted to be able to sand and get down to the original wood later on. (Also, I only used stain because I had it on hand from the Wood Plank Headboard tutorial. You could also use brown acrylic craft paint and it would work just fine too, I’m sure.)
Once the stain was dry, I sanded it down a bit, removing some of the stain but also revealing some of the wood so that the black paint could seep into the plain wood too (in the next step). After sanding, I wiped down with a set cloth to remove all of the dust.
Then, I watered down some black acrylic paint and applied that onto the wood. I watered down the paint for the same reasons as the stain. I just didn’t want it going on too thick.
After that dried, I sanded that too. I really roughed up those edges and even sanded back down to the original wood in some spots. I really liked the variation of all the tones. And see how it’s not so brown anymore? It definitely is more grey-ish with the black paint on top. And looks older. Perfect.
Next, I found images of each of the states where we have lived and then drew them onto taped-together pieces of printer paper. (I just free handed them until they looked right……so no, they’re not exactly perfect. However, you may be able to find somewhere online to enlarge and print out, if you’re not in love with sketching out shapes.)
Then, I traced each state onto my wood with pencil and then painted within the lines with some of our semi-gloss baseboard paint that I have an abundance of. :)
Oh, and I just screwed two eyelet screws onto the back of each of the wood pieces and attached some wire, so we could hang each state on the wall.
And that’s it. So happy to have something that represents our past, our early marriage years, and our current home.
Let me know if you give it a try.
And good luck!
-Ashley
. . . . . . . . . . . . . . . .
Featured Sponsor:

Hi, I’m Ashley—the DIY-enthusiast behind this crazy blog!